Introduction
In our previous blog, we covered widget extensions and their benefits for providing quick, at-a-glance information on the home screen. This blog will walk you through a practical example of integrating iOS widget APIs with real-time data, showing you how it all works step-by-step.
Overview of Real-Time Data Integration
In this blog, we’ll demonstrate how to integrate real-time data into iOS widgets using API calls. This practical example will guide you through connecting a widget with an API to fetch and display live data.
Prerequisites
Before we dive into the code, make sure you have the following:
- Xcode installed (latest version recommended)
- Basic knowledge of Swift and SwiftUI
- An existing iOS project to add the widget extension to
A.Setting Up the Widget Extension
Start by adding a widget extension to your existing iOS project.
- Open your Xcode project.
- Go to File > New > Target.
- Choose Widget Extension from the list and click Next.
- Name your widget (e.g., “TrialWidget”) and ensure that “Include Configuration Intent” is unchecked for this example.
- Click Finish.
Your project will now include a new target with some boilerplate code for the widget.
- Designing the Widget UI with SwiftUI
We’ll design the user interface (UI) of the widget using SwiftUI. Our widget will display a list of posts fetched from an API.
struct TrialWidgetEntryView: View {

    var entry: Provider.Entry

    var body: some View {

        VStack(alignment: .leading, spacing: 10) {

            ForEach(entry.posts, id: \.id) { post in

                VStack(alignment: .leading) {

                    Text(post.title)

                        .font(.headline)

                    Text(post.body)

                        .font(.subheadline)

                        .lineLimit(3) // Adjust based on the size

                    Divider().padding(16)

                    // Replace Divider with Static Image

                    Image("200ok")

                        .resizable()

                        .scaledToFit()

                        .frame(height: 100)

                        .cornerRadius(8)

                }

                .padding()

                .widgetURL(URL(string: "myapp://PostSummary/\(post.title.addingPercentEncoding(withAllowedCharacters: .urlPathAllowed) ?? "")"))

            }

        }

        .padding()

}

  private func fetchData(completion: @escaping ([Post]) -> Void) {

    let url = URL(string: "https://jsonplaceholder.typicode.com/posts")!

    let task = URLSession.shared.dataTask(with: url) { data, response, error in

          guard let data = data, error == nil else {

             print("Failed to fetch data")

             return

          }

          let posts = try? JSONDecoder().decode([Post].self, from: data)

          completion(posts ?? [])

     }

     task.resume()

 }

  struct Post: Decodable {

    let id: Int

    let title: String

    let body: String

  }

    }
D. Updating the Timeline Provider
The TimelineProvider is responsible for managing the data and timeline of the widget. We’ll modify it to fetch data from the API and generate the timeline entries.
struct Provider: TimelineProvider {

    func placeholder(in context: Context) -> SimpleEntry {

        SimpleEntry(date: Date(), posts: [])

    }

    func getSnapshot(in context: Context,

completion: @escaping (SimpleEntry) -> ())         {

        let entry = SimpleEntry(date: Date(),  posts: [])

        completion(entry)

    }

    func getTimeline(in context: Context,

completion: @escaping

(Timeline<SimpleEntry>) -> ()) {

        fetchData { posts in

            let currentDate = Date()

            let refreshDate = Calendar.current.date(byAdding: .minute, value: 1, to:                currentDate)!

            let entries = posts.prefix(5).enumerated().map { index, post in

                SimpleEntry(

                    date: Calendar.current.date(byAdding: .minute, value: index * 1, to: Date())!,

                    posts: Array(posts.prefix(1))

                )

            }

            let timeline = Timeline(entries: entries, policy: .after(refreshDate))

            completion(timeline)

        }

    }

  }

struct SimpleEntry: TimelineEntry {

    let date: Date

    let posts: [Post] // Array of posts

}- Fetching Data from an API
Now we’ll fetch data from an API and populate the widget with it. This step involves writing a function to perform the network request and process the response.
- The Provider conforms to the TimelineProvider protocol, which is responsible for managing and providing data to the widget.
- placeholder(in context: Context) -> SimpleEntry :
- Provides a placeholder entry used to display a preview of the widget when it’s being edited or when data is not yet available.
- getSnapshot(in context: Context, completion: @escaping (SimpleEntry) -> ()):
- Provides a snapshot of the widget’s content to display in the widget gallery or on the widget preview.
- getTimeline(in context: Context, completion: @escaping (Timeline<Entry>) –>())
- Fetches real data and provides it to the widget’s timeline.
- Calls the fetchData function to retrieve posts from the API. It then creates a SimpleEntry with the fetched data and generates a Timeline with this entry, setting the policy to .atEnd to specify when the widget should be updated next. The completion handler is called with this timeline to update the widget.
- Configuring the Widget
Finally, configure the widget with the timeline provider and the SwiftUI view.
The TrialWidget structure defines the configuration and behavior of the widget. It conforms to the Widget protocol, which is required for creating a widget in iOS.
@main

struct TrialWidget: Widget {

    let kind: String = "MyWidget"

    var body: some WidgetConfiguration {

        StaticConfiguration(kind: kind, provider: Provider()) { entry in

            TrialWidgetEntryView(entry: entry)

        }

        .configurationDisplayName("Post Data Widget")

        .description("Displays data from an API.")

        .supportedFamilies([.systemLarge])

    }

}
struct TrialWidget: Widget {
let kind: String = “MyWidget”
var body: some WidgetConfiguration {
StaticConfiguration(kind: kind, provider: Provider()) { entry in
TrialWidgetEntryView(entry: entry)
}
.configurationDisplayName(“Post Data Widget”)
.description(“Displays data from an API.”)
.supportedFamilies([.systemLarge])
}
}
- @main: Marks the entry point of the widget. This annotation indicates that this is the main widget definition to be used by the system.
- var body: some WidgetConfiguration: Defines the configuration of the widget. This is where you set up how the widget will be created and managed by the system.
- StaticConfiguration(kind: kind, provider: Provider()) { entry in: Creates a StaticConfiguration for the widget. This configuration uses a Provider to supply the data for the widget and a closure to define how to display that data using the TrialWidgetEntryView.
- kind: kind: Uses the unique identifier specified earlier.
- provider: Provider(): Specifies the Provider that manages the data and updates for the widget.
- configurationDisplayName: Sets the widget’s name in the gallery.
- description: Provides a brief description of the widget’s functionality.
- supportedFamilies: Specifies which widget sizes are supported.
- Handling User Interaction
We’ve already added interactivity to the widget by using .widgetURL() in the TrialWidgetEntryView. This allows the widget to respond when a user taps on it, deep linking into the app.
To handle the deep link in your app, you’ll need to implement the URL handling in the SceneDelegate or App struct, depending on your app’s structure.
func application(_ app: UIApplication, open url: URL,

                     options: [UIApplication.OpenURLOptionsKey : Any] = [:]) -> Bool {

        if let host = url.host {

            if host == "PostSummary" {

                // Navigate to the specific view in your app

                let postTitle = url.lastPathComponent.removingPercentEncoding

                navigateToPostDetailView(withTitle: postTitle ?? "")

            }

        }

        return true

    }
This XML configuration snippet is from an Info.plist file and includes:
- NSAppTransportSecurity: Allows the app to load data from any network source, bypassing security restrictions (NSAllowsArbitraryLoads set to true).
- CFBundleURLTypes: Configures URL schemes for the app. This allows the app to be launched via custom URL schemes (e.g., myapp). CFBundleIdentifier and CFBundleURLName should be replaced with your bundle identifier.
<dict>
<key>CFBundleURLTypes</key>
<array>
<dict>
<key>CFBundleIdentifier</key>
<string></string>
<key>CFBundleTypeRole</key>
<string>Editor</string>
<key>CFBundleURLName</key>
<string>"Your Indetifier”</string>
<key>CFBundleURLSchemes</key>
<array>
<string>myapp</string>
</array>
</dict>
</array>
<key>NSAppTransportSecurity</key>
<dict>
<key>NSAllowsArbitraryLoads</key>
<true/>
</dict>
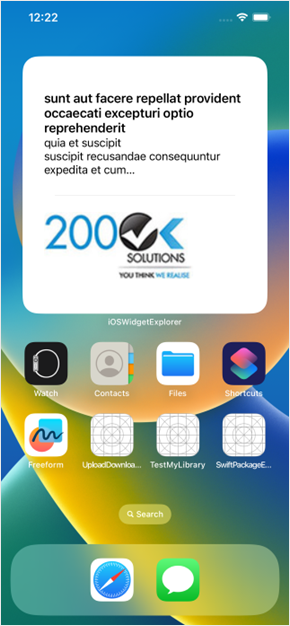
</dict>Here, we’ve included a few screenshots of this demo for your reference.
This screenshot shows the widget we created. the image is static while the text is retrieved from the API.
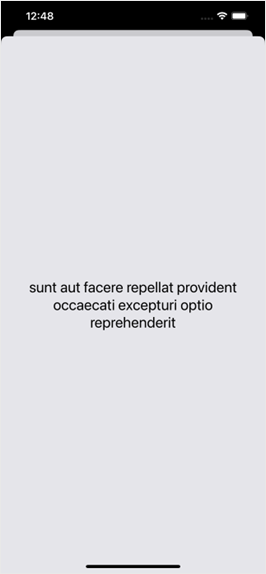
Below screenshot shows the view displayed when tapping on the widget. It presents the post summary controller with the title. Navigation to this page is achieved using a deep link. Since unique identifiers for each piece of data are not feasible in widget extensions, we use the post title for demonstration purposes.
You can find the complete example on GitHub.
Conclusion
In this blog, we’ve explored how to build a dynamic iOS widget that fetches real-time data from an API. We’ve covered widget configuration, data handling, and deep link navigation. This example lays the groundwork for creating more advanced and interactive widgets, allowing you to enhance your iOS apps with useful, glanceable information right on the home screen.
References
- Apple Developer Documentation: WidgetKit
- Apple Developer Documentation: SwiftUI
- Apple Developer Documentation: URLSession
- JSONPlaceholder – Fake Online REST API for Testing