If you’re dealing with a lot of data, you’ve probably heard of sharding. It’s a technique that helps manage large databases by distributing the data across multiple machines.
What Exactly is Sharding?
In today’s world, managing huge amounts of data has become a common challenge for many organizations. When it comes to databases, one of the biggest reasons why people turn to NoSQL databases like MongoDB is because they can handle vast amounts of data efficiently. MongoDB Sharding is a way MongoDB deals with high volumes of data by distributing it across multiple servers.
In simple terms, sharding is the process of splitting large datasets into smaller, more manageable chunks, which are then stored across different MongoDB instances. This becomes crucial because when data grows too large, querying it all at once can put too much pressure on a single server’s CPU, slowing down the system. By spreading the data across multiple machines, MongoDB can handle more requests simultaneously, ensuring better performance.

Why Do We Need Sharding?
When your data grows beyond what a single server can handle, it becomes necessary to scale out. Traditional databases often tried to scale by adding more power (known as vertical scaling) to the same machine, but eventually, every server hits a limit. This is where sharding comes into play, allowing you to horizontally scale by adding more servers instead.
Sharding helps distribute the workload by splitting the data across multiple servers, making it easier to manage large datasets and reducing the load on a single server. This not only ensures better performance but also provides high availability, as each shard (server) contains a replica of the data for redundancy.
Sharded Cluster Architecture
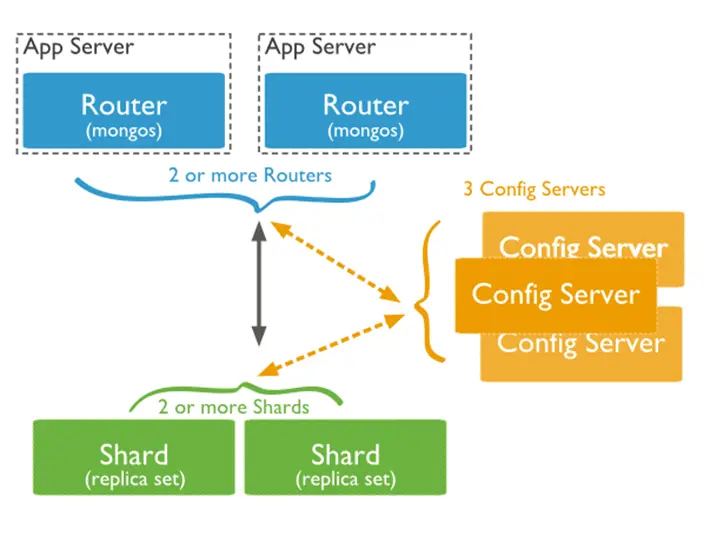
A sharded cluster in MongoDB consists of three main components:
- Shard: A shard is a replica set that holds part of the dataset. Each shard contains a subset of the data, and since each shard is a replica set, it offers data redundancy and high availability.
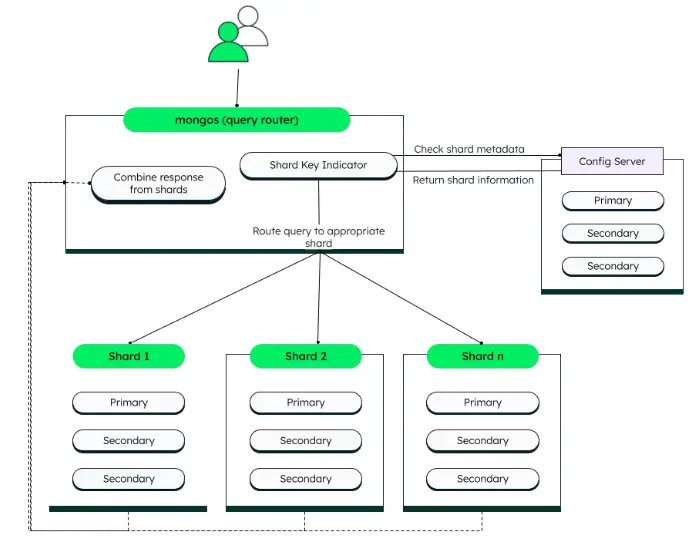
- Mongos Instance: This acts as the router between the application and the shards. The mongos is where your application connects to, and it then decides which shard to send a query to. This ensures that your application doesn’t need to know about the internal structure of the sharded cluster.
- Config Server Replica Set: These servers store metadata about the sharded cluster, like which data is located on which shard. They keep the sharding information and routing data consistent.

Benefits of MongoDB Sharding
1. Increased Throughput: By distributing data across multiple shards, MongoDB can handle more read and write operations. For example, if one shard can process 1,000 operations per second, adding more shards increases the overall throughput to 2,000, 3,000, or even more operations per second.
2. High Availability: Since each shard is a replica set, MongoDB ensures that your data remains available even if a shard goes down. It automatically serves data from the remaining replicas, ensuring uptime.
3. Increased Storage Capacity: With sharding, you can scale your storage capacity almost infinitely. Adding more shards increases the total storage capacity, allowing MongoDB to handle petabytes of data.
4. Better Data Locality: Zone Sharding allows you to distribute your data based on geographic location or other business needs. For example, if you have customers in different regions, you can store their data closer to where it’s being accessed.
Shard Key: The Heart of Data Distribution
To make sharding work, MongoDB uses a shard key. This key is a field in your data that MongoDB uses to decide how to split and distribute the data across shards. For example, if you’re working with a user database, you might choose the user ID as the shard key.
MongoDB then divides the data into chunks based on the values of the shard key, and these chunks are distributed across the shards. The shard key determines how well your data is balanced across shards, so choosing the right shard key is critical for optimal performance. A poor choice of shard key can lead to uneven data distribution, which can hurt performance.
Data Balancing Across Shards
Once data is split across shards, MongoDB automatically manages how the data is distributed to ensure that no shard becomes overloaded. This is done through the balancer, a background process that moves chunks of data between shards to maintain an even distribution of data.
The balancer helps maintain the performance of the system by ensuring that no single shard becomes too full, which could slow down read and write operations.
Sharding Strategies
MongoDB offers several strategies for sharding your data, depending on how your data is structured and how you query it. These strategies include:
- Range Sharding: Data is divided into ranges based on the shard key values. This is useful when queries often access ranges of data.
- Hashed Sharding: A hash function is applied to the shard key, and data is distributed randomly. This ensures an even distribution of data across shards, but it can make range queries less efficient.
- Zone Sharding: Data is divided into zones based on business requirements, such as geography or other custom rules. This allows you to control where data is stored and can be useful for applications with specific data residency needs.
Here’s a simplified, step-by-step guide for deploying a self-managed sharded cluster in MongoDB:
1. Create the Config Server Replica Set
Start Config Server Members: Start each config server replica set member with the following commands:
mongod --configsvr --port 28041 --bind_ip localhost --replSet config_repl --dbpath F:\mongo-tut\shard-practice\configsrv

mongod --configsvr --port 28042 --bind_ip localhost --replSet config_repl --dbpath F:\mongo-tut\shard-practice\configsrv1

mongod --configsvr --port 28043 --bind_ip localhost --replSet config_repl --dbpath F:\mongo-tut\shard-practice\configsrv2
Connect to the Config Server:
Connect using mongosh to one of the config server members:
mongosh --host localhost --port 28041Initiate the Replica Set:
Run the rs.initiate() method to initiate the config server replica set:
rsconf = {

  _id: "config_repl",

  members: [

    { _id: 0, host: "localhost:28041" },

    { _id: 1, host: "localhost:28042" },

    { _id: 2, host: "localhost:28043" }

  ]

}

rs.initiate(rsconf)

rs.status()
2. Create the Shard Replica Sets
Start Shard 1 Members:
Start the shard replica set members for the first shard:
mongod --shardsvr --port 28081 --bind_ip localhost --replSet shard_repl --dbpath F:\mongo-tut\shard-practice\shardrep1

mongod --shardsvr --port 28082 --bind_ip localhost --replSet shard_repl --dbpath F:\mongo-tut\shard-practice\shardrep2

mongod --shardsvr --port 28083 --bind_ip localhost --replSet shard_repl --dbpath F:\mongo-tut\shard-practice\shardrep3
Connect to the Shard 1 Replica Set:
Connect to one of the shard replica set members:
mongosh --host localhost --port 28081Initiate the Shard 1 Replica Set:
Run the rs.initiate() method to initiate the first shard replica set:
rsconf = {

  _id: "shard_repl",

  members: [

    { _id: 0, host: "localhost:28081" },

    { _id: 1, host: "localhost:28082" },

    { _id: 2, host: "localhost:28083" }

  ]

}

rs.initiate(rsconf)

rs.status()
Start Shard 2 Members:
Now start the second shard replica set members:
mongod --shardsvr --port 29081 --bind_ip localhost --replSet shard2_repl --dbpath F:\mongo-tut\shard-practice\shard2rep1

mongod --shardsvr --port 29082 --bind_ip localhost --replSet shard2_repl --dbpath F:\mongo-tut\shard-practice\shard2rep2

mongod --shardsvr --port 29083 --bind_ip localhost --replSet shard2_repl --dbpath F:\mongo-tut\shard-practice\shard2rep3
Connect to the Shard 2 Replica Set:
Connect to one of the shard 2 replica set members:
mongosh --host localhost --port 29081Initiate the Shard 2 Replica Set:
Run the rs.initiate() method to initiate the second shard replica set:
rsconf = {

  _id: "shard2_repl",

  members: [

    { _id: 0, host: "localhost:29081" },

    { _id: 1, host: "localhost:29082" },

    { _id: 2, host: "localhost:29083" }

  ]

}

rs.initiate(rsconf)

rs.status()
3. Start MongoS (Mongos Router)
Start the Mongos Instance:
Start the mongos instance, specifying the config servers:
mongos --configdb config_repl/localhost:28041,localhost:28042,localhost:28043 --bind_ip localhost4. Connect to the Sharded Cluster
Connect to the Sharded Cluster via Mongos:
Use mongosh to connect to the mongos:
mongosh --host localhost --port 270175. Add Shards to the Cluster
Add Shard 1:
sh.addShard("shard_repl/localhost:28081")Add Shard 2:
sh.addShard("shard2_repl/localhost:29081")Add Shard 1 with Multiple Members:
sh.addShard("shard_repl/localhost:28081,localhost:28082,localhost:28083")Add Shard 2 with Multiple Members:
sh.addShard("shard2_repl/localhost:29081,localhost:29082,localhost:29083")6. Enable Sharding for the Database
Enable Sharding on the “users” Database:
sh.enableSharding("users")7. Shard a Collection
Shard the “users.zips” Collection:
First, choose the shard key and apply hashed or range-based sharding:
- Hashed Sharding:
sh.shardCollection("users.zips", { pop : "hashed" })Range-based Sharding:
sh.shardCollection("users.zips", { pop : 1 });This tells MongoDB to:
- Create a sharded collection on the pop field.
- Use range-based sharding with the values of pop in ascending order.
MongoDB will automatically handle the distribution of data across the shards based on the values of pop. This will allow you to query efficiently on the pop field, as MongoDB can identify which shards contain relevant data based on the ranges of pop values.
8. Balancer and Shard Distribution
Check Shard Distribution for “users.zips”: This command checks how the documents in the users.zips collection are distributed across the shards:
sh.balancerCollectionStatus("users.zips")Then, you use this command to see the actual distribution of documents across the shards for the zips collection:
db.zips.getShardDistribution()Shard “users.covid” Collection
sh.shardCollection("users.covid", { iso_code : 1 })- What it does: It tells MongoDB to shard the users.covid collection based on the iso_code field. The 1 means the collection will be sharded in ascending order by iso_code.
- Why it’s useful: This allows MongoDB to spread out the data of users.covid across different shards based on iso_code. So, queries looking for data related to a specific iso_code will be faster because MongoDB will know exactly where to look.
After that, you can check how the data is distributed for the covid collection using:
db.covid.getShardDistribution()It shows how the documents in the users.covid collection are distributed across the shards.
2. Check Sharding Status
You can use this command to check the overall sharding status of your MongoDB setup:
db.printShardingStatus()3. Check Balancer State
You can check the state of the Balancer with this command:
sh.getBalancerState()Conclusion
MongoDB sharding is a powerful technique for scaling your database and managing large datasets. It allows you to distribute data across multiple servers, improving performance and ensuring high availability. By carefully choosing a shard key and using the right sharding strategy, you can ensure that your database remains fast and efficient, no matter how much data you need to store.

