
(React-Native)
Installation
Below is a list of the major dependencies required, and for installation, follow the official documentation.
- react-native-gesture-handler
- react-native-reanimated
- react-native-portal
- react-navigation
- react-native-vector-icons
- redux toolkit
Comprehend portable animated FAB with the help of these steps
- First create Home, Settings and Help screens using react-navigation
- In Home Screen
- Make a Grid that contains icons and labels for settings, help, and logout.
- Render Portable Animated FAB Component
- The Grid item and Animated FAB can be used to navigate to settings and help from the home screen.
3. On the Settings screen, you can add a switch UI to control the visibility of the FAB component and store its value
in the Redux store, so that you can read it anywhere in the application.
Draggable View Component
- Create a file DraggableView.tsx into Components folder.
- Shareable x and y values are used to store current position of the draggable, Shareable context value is used to store last position of draggable x and y.
- An event that includes translateX and translateY is provided by Pan gesture on onUpdate(), and we can create a new draggable position
- o x.value = event.translateX + context.x.value
- o y.value = event.translateY + context.y.value
- The use of GestureDetector and Gesture from react-native-gesture-handler allows for the creation of a draggable view and the rendering of AnimatedFAB as children.
- Dragabble View Component Code
Animated FAB Component
- Create a file AnimatedFAB.tsx into Components folder
- Create an animated view that has a plus icon and incorporate the Draggable view component, as we have done before.
- Now it is possible to move it anywhere on the screen and also outside of it.
Prevent Drag outside of the screen & get latest position on onDragEnd
- With the help of the withSpring() of reanimated, whenever onDragEnd() is called, we will drag it to the closest corner of the screen if it goes outside or anywhere else.
- To get the updated x and y positions, create an onDragEnd worklet and pass it as props to the draggle view component.
Dragabble View Component Code and Animated FAB Component Code
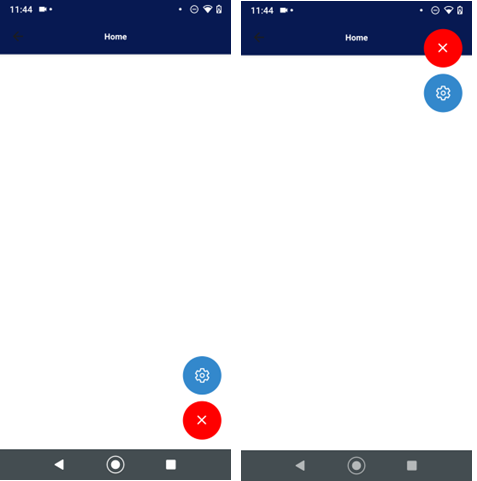
Let’s Add Animated Action Button into Animated FAB
- Create an animated view with a size equal to the FAB button. Now, add the setting icon button at the center of it.
- Let’s animate the setting icon button vertically using the interpolate function from reanimated. This allows you to map a value from one range to another using linear interpolation.
- Create a variable aIsActionBtnsVisible to store 1 or 0 (default is 0),
- interpolate function requires
- @param value — A number from the input range that is going to be mapped to the output range.
- @param inputRange — An array of numbers specifying the input range of the interpolation.
- @param outputRange — An array of numbers specifying the output range of the interpolation.
- Create a variable aInputRangeStart to store inputRange start and end will be 0.
- Create a variable aOutputRangeStart to store OutputRange start, and end will be 0.
- Calculate distance to translate using useDerivedValue based on aIsActionBtnsVisible
- Create animate styles for animated setting view using interpolate and withTiming
- On clicking FAB, change aIsActionBtnsVisible from 0 to 1 via verse.
- Create a FAB icon animated view with rotate-z styles based on aIsActionBtnsVisible. When aIsActionBtnsVisible is 1, rotateZ: 45deg and rotateZ: 0deg for 0 using the interpolate function.
- Animated FAB background color based on aIsActionBtnsVisible using the interpolate function.
- OnDragEnd worklet we are getting positionX and positionY, update aInputRnageStart = – (size of FAB) if the positionY is less than or equal to half of the screen height, otherwise aInputRnageStart = size of FAB
Let’s Add Portal to Animated FAB into HomeScreen.tsx
- Wrap AnimatedFAB component by Portal component from react-native-portal
In Animated FAB Component we have added settings action button only, we can add more action buttons as we want like help, logout etc for that you must create animated styles for such action button.
You can use redux toolkit to show and hide specific action buttons as well as portable Animated FAB
Please check out the demo app for better understanding demo-app-recording